Introduction#
Easter is always fun with family time and telling stories. Yesterday I was explaining to my youngest about classic games I do like, better known as retro arcade games. They shine due their simplicity, no fancy graphics , just for fun! Who didn’t go to the arcade halls these old days, spending their last pennies.
To show them such a classic we watched the movie Pac-Man together. After this I got inspired to host my own Pac-Man game, play together and write this blog to share the tip and tricks how to set this up with Azure Container Instances (ACI) and Azure Cosmos DB (CDB).
AzureBuddy on Social Media like LinkedIn!Credits to Ivan Font for developing the amazing Pac-Man Node.JS app.
Running container workloads with ACI#
When multiple containers or dependencies are involved you may want to go for AKS, but running a simple Node.JS app you may want to look at Azure Container Instances, in short ACI. One of the biggest advantages is that you don’t have to manage the container orchestration tool like with AKS. All management of the orchestration platform and underlying instances is done by the Azure team. Next to that you don’t pay for the instance capacity, but solely for the resources the container image is consuming. In this use case a very good and easy fit for hosting my Pac-Man Node.JS app.
Let’s start with our experiment!
For convenience I have created a repository with all the sample material during this blog. This repository contains my saved ARM templates and other reference material. We will use Bicep to deploy the services, but for this I have chosen to convert the ARM templates (aka JSON style) to Bicep syntax.
This can be done using the following command.
az bicep decompile --file template.json
This creates a template.json which we have to fix a minor thing to support float values. This can be fixed by replacing ‘float(memory)’ for ‘json(memory)’. More can be found on this Github Issue 1386, which is the feature request for Bicep to natively support float values.
Adjust the parameters.json for your needs and we are ready to deploy our container.
az deployment group create --resource-group 'my-playground-sandbox' --template-file template_custom.bicep --parameters '@parameters.json'
Now let’s open the newly started service FQDN (found under Essentials) in a browser and open a session to port 8080. You will see the actual game Pac-Man loading …
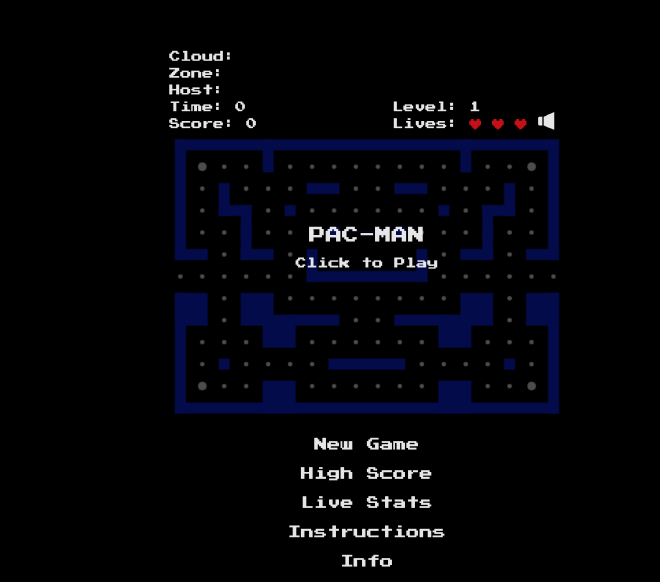
If you see this screen you now have succesfully deployed the Pac-Man Node.JS app as ACI workload, but how is persistency arranged? Let’s look further how to ensure our high scores are stored in a persistent way and don’t get lost. To implement this we are going to use an Azure Cosmos DB. More specific we are going to look at MongoDB compatible engine. How to set up this service is described in the section below.
You may already have seen errors in the container logs? If not, just try the command below to look for MongoDB connection failures.
az container logs --resource-group my-playground-sandbox --name pacman-aci-demo
For now, start a new game to enjoy stateless Pac-Man.
Running MongoDB databases using Cosmos DB#
As may have noticed, the high scores are not saved yet, since there is no persistence in the backend. By inspecting the container logs we already learned about a required MongoDB for storing the game results. Exactly this is what are going to deploy to continue our experiment. Implementation specific we are going to use Azure Cosmos DB for MongoDB accounts, which we are going to consume the Request Units (RU) based approach.
First we are going to create a template again using the Azure portal and convert this using the az bicep decompile command.
As we have learned during the ACI deployment, a file template.bicep is created, which seems to work well, but notice the warnings that are displayed. Mainly related to unused params and readonly properties.
Adjust the parameters.json for your needs and we are ready to deploy our Azure Cosmos DB account. Ensure that to chose an unique name, since during writing of this article Pac-Man was not yet taken as account name.
az deployment group create --resource-group 'my-playground-sandbox' --template-file template_custom.bicep --parameters '@parameters.json'
After some minutes the newly created Cosmos DB account becomes available and we can start creating a Cosmos DB Container, which is the actual Database. Within that Database we create a new Collection, which actually holds the data collection in MongoDB where the documents are stored.
Here we have to keep in mind that Cosmos DB has MongoDB compatibility, but does have some specific requirements. More information can be found here. An example is that Cosmos DB requires the field a query requests a sort on to be indexed. If this is not the case, sort will fail with error=2. Read more about these common errors and solutions here. That’s why we are making use of a pre-defined index idx.json.
Below an example of such idx.json file
[
    {
        "key": {
            "keys": [
                "_id"
            ]
        },
        "options": null
    },
    {
        "key": {
            "keys": [
                "score"
            ]
        },
        "options": null
    }
]
Now it’s time to get hands-on and create the actual Database and Collection with the pre-defined index as shown above.
Creation of these resources can be easily done using the Azure portal or our preferred way using the command below. Ensure that the idx.json is stored in the current path, otherwise the execution will fail.
az cosmosdb mongodb collection create --account-name pacman --name highscore --database-name highscore --idx '@idx.json' --resource-group my-playground-sandbox
After approx 2 minutes the required resources are created and you may want to browse through the actual empty collection, which currently contains no stored Documents.
Rollover the ACI Container workload with configured MongoDB connection settings#
This section we will start with a recap of what we have completed so far.
- We have deployed the Pac-Man containerized app to ACI.
- We have deployed a CDB account and created a MongoDB Collection with a predefined index to store documents.
- For both deployments we have converted the ARM code to Bicep.
This brings us to the point that we have to reconfigure and rollover our ACI deployment with the required connection settings to properly store high scores in MongoDB Collection.
Since we already have deployed and set up CDB we can easily look up the connection information. This can be found in our newly created pacman account, under ’settings, Connection strings’. This connection information is required to properly set up the app credentials and connection information. Below the settings that we are looking for.
| Setting | Value |
|---|---|
| Host | pacman.mongo.cosmos.azure.com |
| Port | 10255 |
| Database | highscore |
| Username | pacman |
| Password | MySecret |
With these settings we can start adjusting our ACI deployment. Let’s start updating our current deployment and add additional parameters to the parameters.json. Challenge here is that we have to assign a secure value. Looking from a Security perspective this isn’t the most preferred way, since we have to store our MONGO_AUTH_PWD in plain text. To overcome this challenge we can set an environment variable (using a .env file) when doing the deployment. Unfortunately JSON parameter files doesn’t support this, so we are going to convert our parameters_DB.json to Bicepparam format.
First things first, we still have to update our current template_custom.bicep to reflect the new deployment. Things to add are:
- @secure() which is a decorator that ensures a secure object, our case param environmentVariable0 as type string.
- Add all other six required variables, as example param environmentVariable1 and don’t forget to set the correct type string.
- After you have defined the Bicep parameters, you need to add the *nvironmentVariables object, which includes all environment variables mapped to a Bicep parameter.
Now complete this environmentVariables object with the Variable names in the table below. Values are set later using the parameters file.
| Variable | Value |
|---|---|
| MONGO_SERVICE_HOST | pacman.mongo.cosmos.azure.com |
| MY_MONGO_PORT | 10255 |
| MONGO_DATABASE | highscore |
| MONGO_AUTH_USER | pacman |
| MONGO_AUTH_PWD | null |
| MONGO_USE_SSL | true |
| MONGO_VALIDATE_SSL | false |
No clue how to implement this? No problem at all. Below an example code snippet to speed things up for extending your Bicep code with some additional parameters.
Btw did you noticed the difference between value and secureValue ? Indeed that’s why we included secure() to ensure string masking.
secure()
param environmentVariable0 string
param environmentVariable1 string

environmentVariables: [
  {
    name: 'MONGO_AUTH_PWD'
    secureValue: environmentVariable0
  }
  {
    name: 'MONGO_SERVICE_HOST'
    value: environmentVariable1
  }
]
As you may remember we didn’t configured the parameters yet. We can start by updating our parameters.json file. For security reasons the actual MONGO_AUTH_PWD value is set to null. After adding the required adjustments we can convert it towards bicepparam for environment variable support.
Below an example snippet how to include the environment variables and store the changes in a new file called parameters_DB.json.
Adding all values be done using this code snippet.
"environmentVariable0": {
  "value": null
},
"environmentVariable1": {
  "value": "pacman.mongo.cosmos.azure.com"
},
Great so far. Let’s give the conversion of our parameters_DB.json a try. Keep in mind that only recent versions of the Azure CLI support decompile-params feature.
az bicep decompile-params --file parameters_DB.json
After running above command a new file called parameters_DB.bicepparam is created for us. Tadaa !!! The file is formatted in bicepparam format, but still requires some manual updates.
For example replace the Using ‘’ to include your newly created bicep template with DB parameters set. See the example snippet below.
Using 'template_custom_DB.bicep'
Also we have to update our environmentVariable0 to be read from an Environment Variable instead of a direct value. For this we can use the *readEnvironmentVariable function.
param environmentVariable0 = readEnvironmentVariable('MONGO_AUTH_PWD')
If you adjusted the parameters_DB.bicepparam we can save the file. Now we are ready to rollover the current running container and start a new ACI deployment using native Bicep code.
Btw don’t forget to create your .env file. I have added an example file in the repository.
source .env
cd arm/deployment-template-aci
az deployment group create --resource-group 'my-playground-sandbox' --template-file template_custom_DB.bicep --parameters parameters_DB.bicepparam
After the deployment has succeeded we can validate if all the resources are available. We can either the Azure Portal or CLI. For now let’s check the actual available resources through the CLI.
az resource list --resource-group my-playground-sandbox --output=table
Now verify in the Azure Portal at ACI Settings\Containers\Events if the container has successfully pulled and started. Here I will show an Azure Portal snippet.
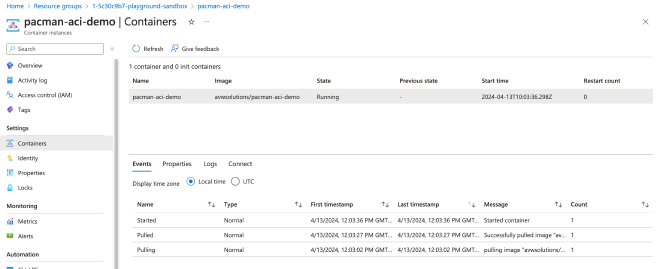
Awesome! if the container has been started we can also look if the configuration has been applied correctly and the MONGO_AUTH_PWD value is not visible. This is shown at the ACI Settings\Containers\Properies.
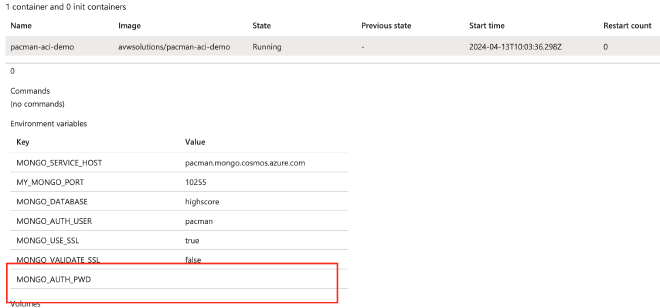
You will find a hidden value like shown above.
Ready to play your first persistent Pac-Man game?
Sstart a browser, open a session again to port 8080 and start your first game. You might still remember where the FQDN can be found :)
When you got Game Over it’s time to save the score and view the highscore list.
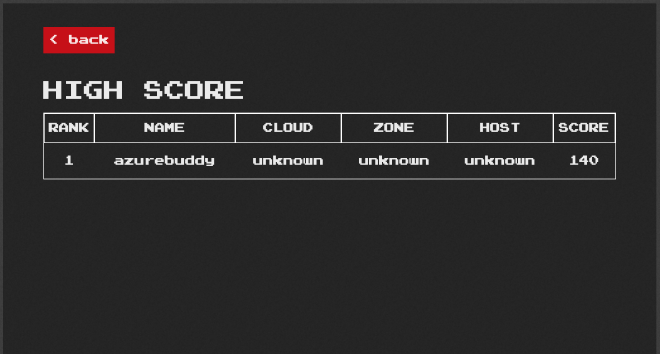
Great. First you may want to verify if the actual document is added to CDB. First place to look are the actual container logs.
az container logs --resource-group my-playground-sandbox --name pacman-aci-demo
Secondly we are using the Azure Portal were we can also browse through the Collection using the Data Explorer. Just open the pacman CDB account and open Data Explorer. This will opens the actual MongoDB API connection, see below.
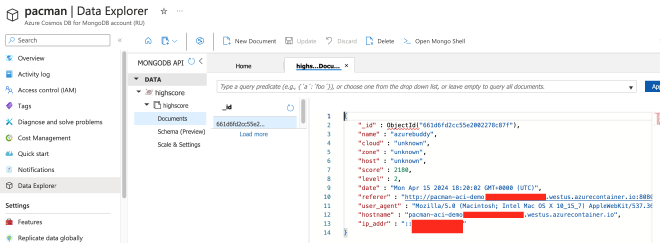
Thing that is still not working well in ACI is updating the cloud, zone and host values. This seems not (yet) to work with ACI, but coming month I will update the code to fix this bug. also HTTPS Encryption in Transit is not yet available, let’s solve this challenge in our next part!
Enable automatic HTTPS by introducing Caddy as Reverse Proxy#
During my first game I still missed some basic security feature related to Encryption in transit. In these cases we either use an Azure Load Balancer or an Reverse Proxy. In this sandbox chose the common practice of using a sidecar container. The sidecar will run Caddy as Reverse Proxy. To acommplish this I need to update the ACI deployment Bicep code and ensure we have an Azure Storage Account called 123pacman for persistency. The ST is needed to store three particular file shares of the Caddy configuration, namely the Caddyfile which contains the site definition, Config directory which contains the configuration files and the data directory which contains the actual data files.
First create the ST. For this deployment I have created a Bicep template with a minimal parameters file. You can find the example in the repository under Deployment-template-STG.
cd arm/deployment-template-stg
az deployment group create --resource-group 'my-playground-sandbox' --template-file template.bicep --parameters parameters.bicepparam
After creation we can start uploading an initial Caddyfile to the proxy-caddyfile share. Ensure that it contains the following site block that is actual your FQDN with the reverse_proxy reference to the Node.JS app port 8080.
pacman-aci-demo.ema5asetfaguf9a9.westus.azurecontainer.io {
    reverse_proxy http://localhost:8080
}
Last step is to integrate the sidecar into the ContainerGroups configuration. Below a snippet of the Caddy container. Take extra care with the curly brackets. When you are ready save the file as template_custom_DB_HTTPS.bicep.
{
  name: 'reverse-proxy'
  properties: {
    image: caddyImage
    ports: [
      {
        protocol: 'TCP'
        port: 80
      }
      {
        protocol: 'TCP'
        port: 443
      }
    ]
    volumeMounts: [
      {
        name: 'proxy-caddyfile'
        mountPath: '/etc/caddy'
      }
      {
        name: 'proxy-data'
        mountPath: '/data'
      }
      {
        name: 'proxy-config'
        mountPath: '/config'
      }
    ]
    resources: {
      requests: {
        cpu: json('1.0')
        memoryInGB: json('1.0')
      }
      limits: {
        cpu: json('1.0')
        memoryInGB: json('1.0')
      }
    }
  }
}
I’ve also added three additional params to the parameters_DB.bicepparam and included the ACCESS_KEY as Environment Variable. When you are ready save the new bicepparam file as parameters_DB_HTTPS.bicepparam.
param caddyImage = 'caddy:2.6'

param storageAccountName = '123pacman'

param storageAccountKey = readEnvironmentVariable('ACCESS_KEY')
Looking for the complete example? Just have a look at the Deployment-template-ACI
Last thing to remind is to update your local .env file to include the ACCESS_KEY.
We are now ready to redeploy the ACI instance again, which now includes a sidecar to force HTTPS TLS encrypted traffic using a Reverse Proxy.
source .env
cd arm/deployment-template-aci
az deployment group create --resource-group 'my-playground-sandbox' --template-file template_custom_DB_HTTPS.bicep --parameters parameters_DB_HTTPS.bicepparam
Use the Azure Portal to verify if all containers entered the Running state.
When you verified the deployment, open the browser and open the FQDN again with https:// ( so without 8080 ). Does the page open well and is HTTPS shown?

Additional you can verify if a certificate is automatically issued by the Let’s Encrypt service. By default the certificate is renewed after 3 months.
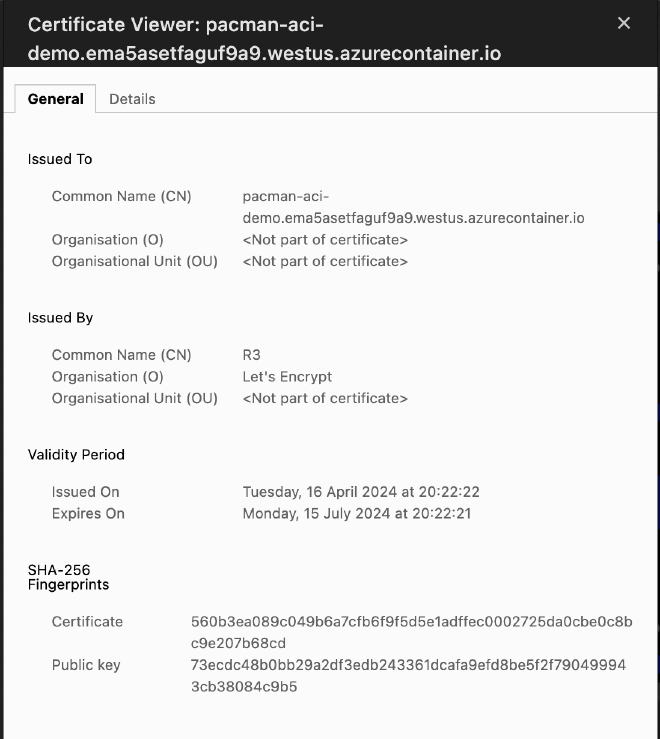
Now quickly start playing and enjoy Pac-Man. Which level did you reach? You can share your highest score with us!
Conclusion#
If you are looking for an easy way of deploying containerized resources you may want to have a look at ACI. It provides a straightforward process and takes away the complexity of managing a full-blown Kubernetes environment. Afaik there are some limitations, but these are mainly related when you are requiring more advanced features such as networking or platform integration you may be better off with AKS. Last thing to remember is that ACI does support Confidential Containers using AMD EPYC processors that provide Confidential Computing capabilities. Additional for this use case that is does require an Attestation, included as sidecar.
Unfortunately during our experiment we still found some limitations, such as pulling container images directly from quay.io. This resulted in container Waiting state.
Hopefully you liked this Tip & tricks how to article, which explains the basics of getting up & running with Azure Container Instances and Azure Cosmos DB. Now it’s time to host and play your own retro arcade game Pac-Man!
Interested in the code?#
All code samples, including local scripts is available at Azure Buddy Github.
Contributions or follow-up articles are more than appreciated!
